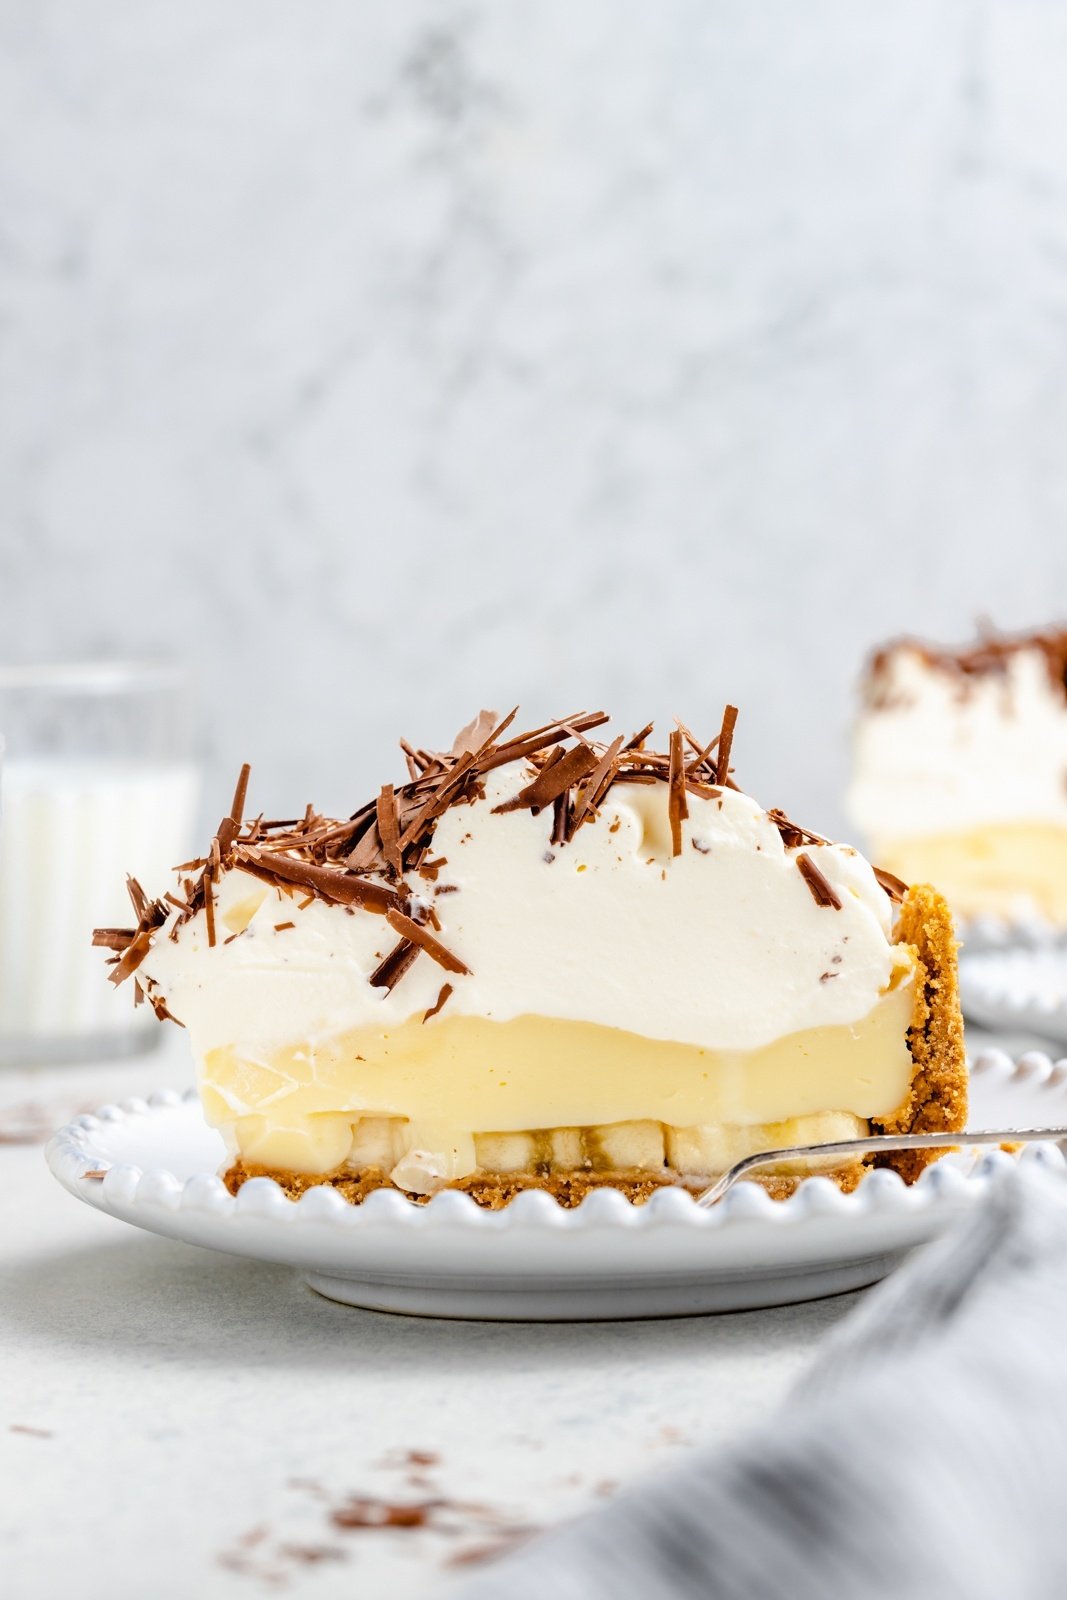
I originally made this gorgeous pie for Thanksgiving 3 years ago, but I say, why not make a creamy chilled pie in the summer?! If you’ve made any of my pie recipes in the past (my dutch apple is a must for this fall) you know that I don’t mess around when it comes to an incredible homemade pie.
This is truly the most amazing banana cream pie recipe you’ll ever make. It’s deliciously rich, perfectly sweet, and has a peanut butter cookie crust that is everything you need and more. I know making a chilled pie like this can seem intimidating, but trust me when I say it’s WAY easier to make than you think! Check out Episode 2 of my YouTube series, Good Mood Comfort Food HERE to see how it’s done.
Surprise friends and family for birthdays, holidays, and “just because” with a dessert that’s guaranteed to turn heads and draw people in for seconds!


What is banana cream pie?
If you’ve never had banana cream pie before OMG get ready to fall in love. Old-fashioned banana cream pie is basically a buttery pie crust layered with fresh bananas, a thick vanilla pudding/custard mixture, and topped with whipped cream. There aren’t actually any banans in the filling!
My world’s best banana cream pie recipe jazzes up the traditional version by using an epic peanut butter cookie crust. Plus, we’re skipping the boxed pudding often found in the middle and making our own vanilla filling. SO GOOD.


Tools you’ll need
Making banana cream pie from scratch is a bit of an art and science, so you’ll need the right tools:
Get all of our go-to kitchen essentials here!


Ingredients in this banana cream pie recipe
Homemade banana cream pie may look intimidating to make, but the ingredients are actually fairly simple. You’ll need:
- For the filling: the vanilla custard filling is made with whole milk (or 2% milk), egg yolks, granulated sugar, cornstarch for thickening, salt, bourbon or scotch (optional, but delicious), vanilla extract, and butter. You’ll also need fresh bananas to slice and layer on the bottom.
- For the crust: my special peanut butter cookie crust is made with nutter butters and some melted butter. So easy!
- For topping: skip the cool whip this time — gotta have that fresh whipped cream! It’s made with heavy whipping cream, powdered sugar, and vanilla extract. Learn how to make perfect homemade whipped cream here!
- To garnish: I love topping my pie with cute chocolate curls from a dark chocolate bar, but see below for even more ways to customize.


Make your banana cream pie with different types of crust
Although I’m truly obsessed with the flavor in the peanut butter cookie crust (peanut butter lovers, rejoice) you have plenty of options for making a crust:
- Feel free to use a regular pie crust like my homemade all-butter pie crust for a more traditional banana cream pie. Be sure to blind-bake the crust first as you will not be baking the pie after adding the filling (like in apple or pumpkin pies). Get all of my tips for doing a blind bake with pie weights or dried beans in this video!
- Try using other cookies for a different flavored cookie crust! Oreo, a vanilla wafer, or a graham cracker crust would be amazing.


A note on substitutions
I know I’ll get a variety of questions like how to make this banana cream pie vegan or gluten free, but unfortunately, this is the only way I’ve tested the pie and it is a tried & true recipe. It is an indulgent dessert that’s perfect for special occasions! I cannot recommend a vegan substitute, but let me know if you have a favorite gluten free crust option that you try.
How to make banana cream pie from scratch
Now that you have all of your ingredients, it’s time to layer this baby up. These are the basics, but be sure to read each instruction in the actual recipe at the bottom of the post very carefully to ensure success:
- Prep your pan. You’ll start by greasing a 9-inch springform pan or a deep dish pie pan.
- Make & add the crust. Next, pulse the nutter butters in your food processor, add melted butter, and pulse again until combined. The mixture will be like wet sand (and this will be your “pie dough!”), and you’ll then pour it into your pan. Press into the bottom and sides so that a nice crust forms — using a small measuring cup can help!
- Bake & cool. Bake the crust for just about 10 minutes, then let it cool completely.
- Mix the filling. While the crust is cooling, whisk together the egg yolks, sugar, cornstarch and salt in a large saucepan until smooth.
- Heat & add the milk. Add milk to a separate, small pot and bring it to a slight simmer without boiling it. Once it starts to simmer, remove it from the heat and whisk 1/3 cup of hot milk into your egg mixture. Whisk it well so that the milk doesn’t turn the yolks into scrambled eggs! Continue with the rest of the milk.
- Finish the filling. Place the pan over medium heat and keep whisking until the mixture gets warm, slightly boils, and starts to thicken. Pay attention as this can happen quickly. Once it has a custard-like texture, remove it from the heat and stir in the vanilla, bourbon & butter.
- Assemble & chill the pie. Add banana slices to the bottom of the cooled pie crust, and then pour the filling on top. Smooth it so that it’s well distributed, then cover with plastic wrap so that it touches the filling and refrigerate for 2-4 hours until cold. That’s right, instead of baking we’re just chilling the pie before serving!
- Add whipped cream & serve. When you’re about ready to serve, make your whipped cream and then evenly spread it all over the cold pie filling. Garnish with chocolate curls or your fav toppings and devour!


Delicious ways to make this banana cream pie your own
Besides choosing your favorite pie crust, you can easily make this banana cream pie your own by:
- Adding a layer of peanut butter to the bottom of the crust before adding the bananas (use the code ‘AMBITIOUS15’ for 15% off my favorite brand, Wild Friends!)
- Dusting the top with cocoa powder
- Drizzling homemade salted caramel on top (my peanut butter caramel would be amazing)
- Sprinkling the top with toasted coconut
How to store banana cream pie
Store any leftover banana cream pie loosely covered with plastic wrap or foil in the refrigerator for up to 3-4 days.


Make it ahead of time
You can easily make one or both parts of the banana cream pie 1-2 days ahead of time to save time on the day of holiday festivities.
- To make pie crust ahead of time: after baking the pie crust, simply store it covered in the refrigerator until you’re ready to assemble and chill the rest of the pie.
- To make filling ahead of time: once you’ve mixed the whole filling together, cover the filling with plastic wrap so that the plastic is touching the top of the filling (to prevent air from getting in) and chill the filling in the refrigerator until you’re ready to assemble the pie. You can also make the whipped cream topping ahead of time and store it in an airtight container until you’re ready to add it to the pie!
More cakes and pies you’ll love
Get all of our delicious dessert recipes here!
I hope you love this amazing banana cream pie recipe! If you make it be sure to leave a comment and a rating so I know how you liked it. Enjoy, xo!


The
Ambitious Kitchen
Cookbook
125 Ridiculously Good For You, Sometimes Indulgent, and Absolutely Never Boring Recipes for Every Meal of the Day
World’s Best Banana Cream Pie


The world’s best banana cream pie with a peanut butter cookie crust and a homemade whipped cream topping. This easy banana cream pie recipe is made without boxed pudding and is delicious topped with chocolate curls, toasted coconut, and anything else your heart desires. The perfect dessert for the holidays!
Ingredients
- For the filling:
- 2 cups (480g) whole milk (or sub 2%)
- 4 large egg yolks
- ½ cup (100g) granulated sugar
- ¼ cup (32g) cornstarch
- Pinch of salt
- 1 tablespoon bourbon or scotch (optional, but recommend)
- 1 tablespoon vanilla extract
- 2 tablespoons salted butter, cut into ½ inch pieces
- 2-3 large ripe bananas, sliced
- For the peanut butter cookie crust:
- 20-25 nutter butters*
- ¼ cup (57g) melted butter
- For the topping:
- 16 ounces (1 pint) heavy whipping cream
- 3 tablespoons powdered sugar
- ½ teaspoon vanilla extract
- To garnish:
- Dark chocolate for chocolate curls
Instructions
-
Preheat the oven to 350 degrees F. Grease a 9 inch springform pan with nonstick cooking spray or melted butter. This creates such a gorgeous pie but you can also use a regular deep dish pie pan to make this pie too!
-
Start by making the crust: Place cookies into the bowl of a food processor and pulse for 1-2 minutes or until cookies are finely crushed. Add in melted butter and process again until well combined.
-
Dump the mixture into the prepared pie pan and press into the bottom and side evenly. It should come up at least an inch to an inch and a half on the sides. Sometimes I find it helpful to use a small measuring cup to help set the crust firmly and get the crumbs up the side of the pan. Bake for 10 minutes then remove from the oven and place on a wire rack to cool. FYI: The crust will need to be somewhat cool to the touch before you can add the filling.
-
To make the filling: In a large saucepan, mix the yolks, sugar, cornstarch and salt until well combined and thick. It may take some time to get it all combined but the mixture should be silky smooth once you’re done.
-
Next, add milk to a small pot and bring to a slight simmer. Do not boil the milk. You just want it to start to slightly bubble and simmer along the edges. Remove from heat once simmering and immediately whisk in ⅓ cup of the hot milk into the egg mixture, keep whisking as we don’t want the eggs to curdle! You’ll need to be quick. Slowly whisk in the rest of the hot milk and continue to whisk.
-
After all the milk is whisked into the pan with the egg mixture, immediately place the pan over medium heat and continue to whisk, ensuring that you get the sides and edges of the pan. Once the mixture starts to get warm and slightly boils, it may thicken VERY quickly so you must pay attention closely. Once the mixture thickens to be custard-like or almost like a thick peanut butter (which shouldn’t take that long), you can immediately remove from the heat and stir in the vanilla extract, bourbon and butter; stirring until well combined.
-
Next add banana slices all over the bottom of the pie crust so that they are touching. Pour the filling into the cooled cookie pie crust and smooth the top. Cover with plastic wrap so that it touches the filling and refrigerate for 2-4 hours or until cold.
-
Once pie and filling are cold and you are ready to serve, make the whipped cream topping: Add heavy whipped cream, powdered sugar and vanilla extract to the bowl of an electric mixer (or use a hand mixer!); beat on high until cream reaches stiff peaks. Taste and add additional sugar if necessary and mix once more.
-
Evenly spread whipped cream over pie filling, then garnish with dark chocolate shavings or dust pie with a little cocoa powder. Serves 9-12, depending on how large you cut the slices. Pie will stay fresh for a few days if properly covered and stored in the fridge.
Recipe Notes
*See the full post for ways to customize your crust and delicious ideas for toppings! Plus storing and make-ahead options.
Recipe by: Monique Volz // Ambitious Kitchen | Photography by: Eat Love Eats
This post was originally published on November 12th, 2021, and republished on August 17th, 2024.


