I’m SO excited to re-share this recipe with you from back in 2012. Yes, over 10 years ago (photo evidence included)! The story behind this recipe tells you everything you have to know, so let’s throw it back:
“This past week has been completely crazy! I flew to New York to meet and cook with Bobby Flay at his restaurant! Whattt?! I know! My dessert was selected by Fage Total Greek Yogurt to be served at their event, and I can’t express how blessed I feel. I met some fabulous food editors, and of course, Bobby. He was incredibly sweet and complimented me on how delicious this dark chocolate cheesecake was.
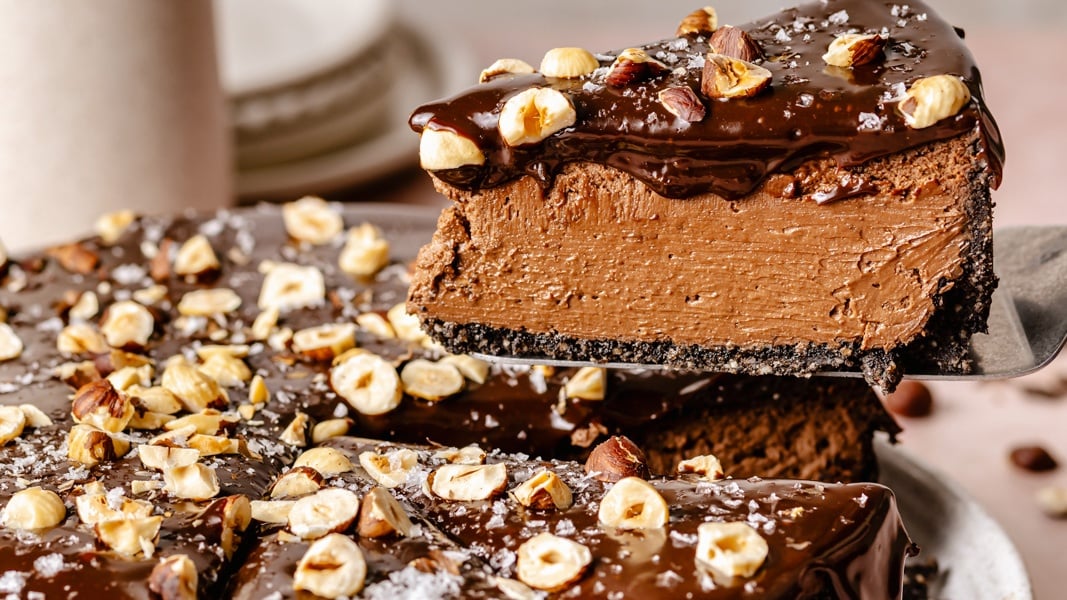
THE CHEESECAKE?! Can we just talk about it? It’s a dense, smooth, chocolate-wasted cheesecake that I want to live in for the rest of my life. I’m SERIOUS. Oh and not to mention that it has a creamy, rich chocolate hazelnut butter (Nutella) ganache, toasted hazelnuts, and sea salt.
Please prepare yourself to drool.
Coming up with this recipe was quite a process. I knew that I wanted to use Greek yogurt, but also that I wanted to make a dessert that could be presented in a restaurant or made for a special occasion such as a holiday party. It had to be decadent, rich, and everything you could ever want in your mouth.
Now here’s the funny part: I’m not a cheesecake girl. I typically go for pie during the holidays, but I wanted to challenge myself to craft something beautiful and unique. And in my opinion, there’s really nothing better than dark chocolate and sea salt. OBVIOUSLY.
There are not enough happy adjectives to describe this cheesecake. There are simply no words.
But I think that if Bobby says it’s good, well then… you know it’s GOOD.”


What is cheesecake?
Let’s get to the recipe! No, we’re not adding mozzarella or a bag of shredded cheese to a cake (but you probably knew that already). Cheesecake is made out of a mix of neutral, soft cheese like cream cheese, or even cottage cheese or ricotta, plus eggs, and sugar. The crust can vary from using crushed-up cookies to a full pastry dough crust. Different cities claim to have different styles of cheesecake, too! For example, a New York-style cheesecake typically includes heavy cream or sour cream to make it denser and creamier, whereas a Roman-style cheesecake is typically made with ricotta or mascarpone instead of cream cheese.
You may (or may not) have noticed that in terms of desserts, I’m all about cookies, bars, and an occasional really good cake or pie. To me, cheesecake is one of those desserts that can either be incredible or a little bit lacking. Trust me when I say THIS gorgeous chocolate cheesecake will convert anyone who doesn’t normally love cheesecake.


No bake vs. baked cheesecake
That’s right, different cheesecake recipes can be baked, while some are no bake recipes!
- No bake cheesecake is typically made with ingredients like gelatin, pudding, or whipped cream that get their softer texture from refrigerating only. The result is a light, fluffy texture like mousse — similar to my Deep Dish French Silk Pie.
- Baked cheesecake, like this chocolate cheesecake, is (you guessed it) baked! The texture is denser, and creamier, and holds up well to toppings like my Nutella ganache.


Tools you’ll need
There are a few essential tools you’ll need to make a perfect chocolate cheesecake:
Get all of my kitchen essentials here!
Everything you’ll need to make the best chocolate cheesecake
Baking cheesecake is truly a science, so the ingredients matter! As I mentioned above there are tons of different ways to make cheesecake from scratch, but I truly perfected this dark chocolate cheesecake using specific ingredients. Here’s what you’ll need:
- For the crust: we’re making a hazelnut cookie crust with chocolate sandwich cookies (I just use Oreos), raw hazelnuts, and some melted salted butter.
- For the filling: my chocolate cheesecake filling is made with full-fat cream cheese, plain whole-milk Greek yogurt, granulated sugar, melted dark chocolate (from a 72% dark chocolate bar), unsweetened cocoa powder, salt, and full eggs. I recommend using chopped dark chocolate instead of chocolate chips for the best flavor and melting ability.
- For topping: there are tons of ways to top your cheesecake, but this salted Nutella ganache is out-of-this-world delicious. It’s made with chocolate hazelnut butter (aka Nutella), heavy cream, and more chopped dark chocolate. I like to then sprinkle chopped toasted hazelnuts and Maldon sea salt on top because WOW.


A note on substitutions
Because baking cheesecake is incredibly precise, I HIGHLY recommend sticking with the ingredients listed and not swapping anything. I haven’t tested out any dairy-free or vegan swaps in this recipe and I cannot be certain that the textures and flavors will come out the same.
You can, however, swap the Nutella for chocolate almond butter, if you’d like.


How to make the best chocolate cheesecake
- Prepare the crust. Start by pulsing the Oreo cookies and hazelnuts in a food processor until they’re finely ground. Pour in the melted butter and pulse again until the mixture resembles wet sand, then evenly press the mixture into the bottom and sides of a greased springform pan. Bake the Oreo crust, then place it on a wire rack to cool.
- Melt the chocolate. Melt your chopped chocolate in a double boiler or a microwave-safe bowl, stirring occasionally, until smooth. Let the chocolate cool to room temperature.
- Make the filling. Mix the cream cheese, Greek yogurt, and sugar in the bowl of a stand mixer on medium-low speed until smooth. Do not overmix! Mix in the cocoa powder and salt, then add in the eggs one at a time and mix until just incorporated. Pour in the melted chocolate and mix on low speed until well incorporated.
- Prepare your pan. Double-wrap the bottoms and sides of the springform pan well with aluminum foil and place it into a large roasting pan. Pour the filling over the cooled crust and smooth the top.
- Make a water bath. Boil a large pot of water (or boil water in a kettle). Place the roasting pan with your cheesecake on the middle rack of your oven, and carefully pour the boiling water into the roasting pan part so that it’s 1 inch deep.
- Bake it up. Bake the cheesecake until the center is just set and appears dry (it might still be a little jiggly). Turn the oven off and crack open the oven door while keeping the cheesecake inside, and let it sit for 30-60 minutes. Remove everything from the oven and place the cheesecake on a wire rack to cool. Run a knife around the crust to loosen it, then chill the cheesecake in the fridge for at least 4 hours.
- Make the ganache. Heat the heavy cream over medium-low in a saucepan, stir in the Nutella, then add more chopped dark chocolate and stir until melted. Pour the chocolate ganache over the center of the chilled cheesecake and spread it to the edges. Top with hazelnuts and flaky salt, let it set, then serve!


Wait, what is a water bath?
A water bath refers to cooking or baking your food in a pan or container that’s sitting in another container of boiling water. The water from the pan creates moisture in the oven to prevent your food (in this case, cheesecake) from drying out and cracking. The water essentially absorbs the direct heat of the oven, allowing for the cheesecake to bake more evenly.
This is why you’ll place your springform pan with the cheesecake into a bigger roasting pan, then fill it with boiling water and bake it!
Tips for making perfect chocolate cheesecake
Making homemade cheesecake is a labor of love and requires some good attention to detail. Temperature is KEY here! Don’t worry, I’ve got all of the best tips, “do’s,” and “don’ts” for you so that it will turn out perfectly every time:
- Use room temp ingredients. It’s crucial to use room-temperature cream cheese and eggs in the filling and to let your melted chocolate come to room temperature before mixing it in. Mixing hot and cold ingredients anywhere in the recipe will give you a cheesecake that’s not smooth and creamy.
- Do not overmix. When mixing your filling, slow and steady is best! Overmixing will result in a really dense cheesecake, and mixing too fast will beat too much air into the filling.
- Do not over-fill the pan. Remember to use a 9-inch springform pan, as anything smaller will cause you to overfill it and might result in the filling leaking into your oven.
- Do not overbake. Be sure to take your cheesecake out of the oven even if it looks slightly underbaked. The cheesecake will continue to set as it cools, and we don’t want a dry cheesecake!
- Use the oven door method. Once your cheesecake is done baking, use the oven door method by turning off the oven, cracking the door, and letting the cheesecake sit for 30-60 minutes. This will help the cheesecake cool slowly instead of having it go from a very hot oven to room temperature all at once (which could create cracks).
- Cool again before chilling. After removing the cheesecake from the oven and the water bath, place it on a wire rack to cool to room temp before chilling it in the refrigerator. Again, we want to cool the cheesecake slowly, in steps, to prevent cracking.


Use this trick for slicing your chocolate cheesecake
Because cheesecake is a bit more fragile than a traditional cake, I recommend running your knife under hot water before slicing into the cheesecake. This will allow you to cut perfect pieces without pulling some of the filling out with your knife.


How to store homemade chocolate cheesecake
- To store: store the cheesecake covered in the refrigerator for up to 2-3 days. After that, the crust will start to soften too much.
- To freeze: feel free to freeze the entire cheesecake or individual slices. Place the cheesecake in the freezer until firm, then wrap the cheesecake or slices well in plastic wrap and place in an airtight container or silicone bag for up to 3 months. When ready to enjoy, defrost in the refrigerator overnight and enjoy.
More decadent desserts you’ll love
Get all of my dessert recipes here!
I hope you LOVE this dark chocolate cheesecake recipe. If you make it be sure to leave a comment and a rating so I know how you liked it!
Dark Chocolate Cheesecake with Salted Nutella Ganache


Decadent dark chocolate cheesecake with an incredible salted Nutella ganache. This beautiful, rich chocolate cheesecake has a hazelnut & chocolate cookie crust for the ultimate chocolate lovers’ dessert that’s perfect for birthdays or the holidays!
Ingredients
- For the crust:
- 24 chocolate sandwich cookies (Oreos are good)
- 1 cup raw hazelnuts
- ¼ cup salted butter, melted
- For the filling:
- 10 ounces 72% dark chocolate, chopped
- 24 ounces full-fat cream cheese, softened at room temperature
- ¾ cup plain whole-milk Greek yogurt (siggi’s or fage)
- 1 ¼ cups granulated sugar
- ¼ cup unsweetened cocoa powder (use dark cocoa for more intensity)
- ½ teaspoon salt
- 4 eggs, at room temperature
- Chocolate Hazelnut Ganache:
- ½ cup chocolate hazelnut butter (Nutella)
- ½ cup heavy cream
- 2 ounces 72% dark chocolate, chopped
- ¼ cup toasted hazelnuts, chopped
- 1 teaspoon flakey sea salt (I like Maldon), plus more if desired
Instructions
-
Preheat oven to 350°F. Grease the inside of a 9-inch springform pan with cooking spray and set aside.
-
Place chocolate sandwich cookies and hazelnuts in a food processor and pulse until finely ground; add melted butter and process again until well combined and cookie crumbs resemble wet sand. Scrape into prepared pan and use the back of a measuring cup to firmly press and compact into the bottom and up the side of the pan, making sure the crust is even. Bake in oven for 10 to 12 minutes. Place on wire rack to cool. Keep temperature in oven.
-
Prepare cheesecake filling by placing 10 ounces of chopped chocolate in a double boiler, stirring occasionally, until smooth and creamy. Alternatively you can add the chocolate to a medium microwave safe bowl and microwave in 30 second increments, stirring in between, until chocolate is melted. Remove from heat and let cool to room temperature, at least 10 to 15 minutes. We do not want the chocolate hot when going into our cheesecake filling!
-
In the bowl of an electric mixer, add cream cheese, Greek yogurt and sugar and mix on medium-low speed until just combined and smooth, about 1 minute. The trick here is to not overmix or beat too much air into the batter, so slow and steady is best.
-
Next, add in the cocoa powder and salt and mix again on medium-low speed until smooth and well combined, scraping down the bowl as necessary and mixing once more until just combined. Add in the eggs, one at a time, mixing on medium-low speed until just incorporated. Scrape down the bowl again, as necessary. Lastly, add the melted chocolate and mix on low speed until well incorporated and distributed.
-
Double wrap the bottoms and sides of the pan with the crust with foil. Place the wrapped cheesecake pan into a large roasting pan (or any pan large enough to fit the springform pan in). Pour chocolate cheesecake filling over the cooled crust in the springform pan and smooth the top with a spatula.
-
To make a water bath: Boil a large pot of water or boil water in a kettle for ease. Once water is boiling, add the roasting pan with the cheesecake to the middle rack of your oven. Gently and slowly pour boiling water (or VERY hot water) into the roasting pan with the cheesecake (the kettle will make it easier to pour in), making sure it’s about 1 inch deep so that it doesn’t evaporate when you are baking your cheesecake. Gently push rack back in the oven and close the door.
-
Bake until the cheesecake center is just set and just appears dry, about 1 hour to 1 hour and 15 minutes. (Do not worry if the cheesecake cracks while baking; this will be covered with ganache!) The cheesecake may still just slightly jiggle in the middle. Turn off the oven and crack open the oven door but do not remove the cheesecake from the oven. Allow cheesecake to sit in the oven for 30 minutes to an hour to avoid drastic temperature changes which can crack the cheesecake.
-
After 30 minutes to 1 hour, remove the roasting pan from the oven and carefully transfer springform pan to a wire rack. Do not remove cheesecake from the springform pan. Simply run a knife around the crust to loosen it, then chill the cheesecake for a minimum of 4 hours in fridge, although overnight is best! Once ready to top, remove cheesecake from the pan.
-
To make the chocolate hazelnut ganache: In a medium saucepan, heat heavy cream over medium-low heat until warm. Add chocolate hazelnut butter and stir until smooth, then add in 2 ounces of chopped dark chocolate and stir until completely melted. Remove from heat. Pour over the center of the chocolate cheesecake and spread to outer edges. Top with chopped toasted hazelnuts and sprinkle with sea salt. Allow ganache to set for 10 minutes, then serve immediately or place back in the fridge for serving later.
-
Cheesecake is best within 2-3 days of making, as the crust will soften as the days go on. Cut into 12-16 slices and enjoy!
Recipe Notes
See the full post for all of my tips, tricks, storing & freezing instructions!
Recipe by: Monique Volz // Ambitious Kitchen | Photography by: Eat Love Eats
This post was originally published on November 18th, 2012, and republished on December 14th, 2023.

