
Every year, I get so excited to share a brand new cake recipe with you that’s meant for celebrating and sharing with loved ones. With Valentine’s Day next weekend, I knew I wanted to create an extra special cake to spread the love.
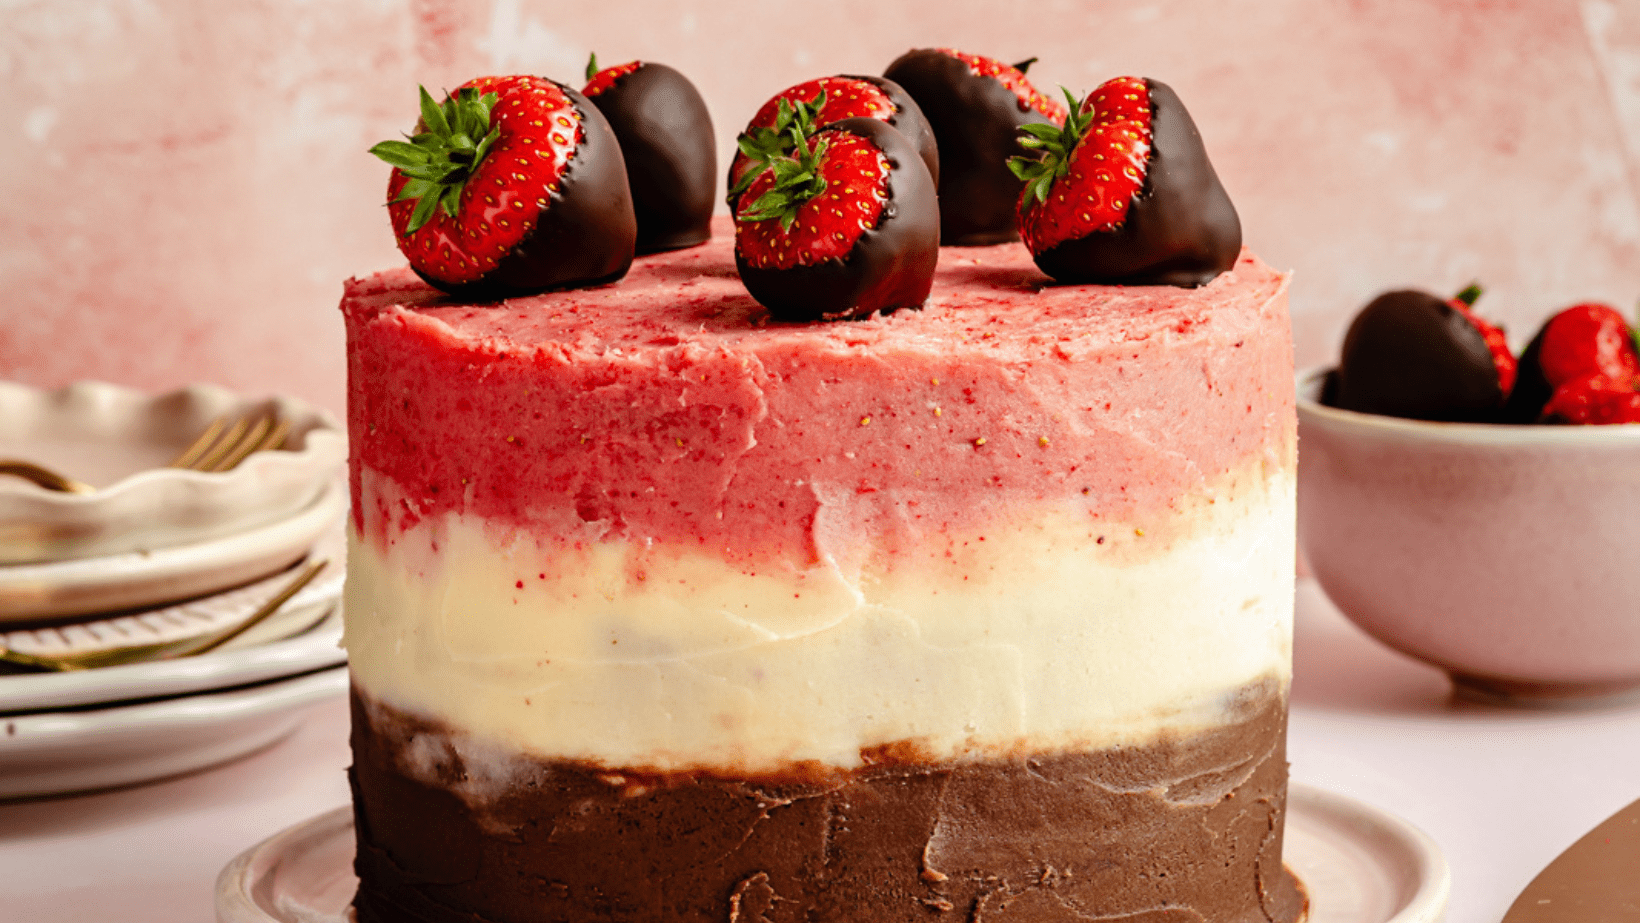
This Neapolitan cake is just as delicious as it is beautiful. You’ll bake up gluten-free chocolate, vanilla, and strawberry cakes, whip together incredible buttercream frostings to go with each layer, and stack them up to create one of the most fun three-layer cakes you’ll ever make. I mean, isn’t she a show-stopper?!
Bake it up with your littles for V-Day, share slices with the girls for your upcoming Galentine’s Day celebration, or just enjoy an exciting baking project that will leave you feeling proud of your work. Sending lots of love this season!

What is a Neapolitan cake?
Remember the boxes of ice cream with chocolate, vanilla, and strawberry flavors in different layers of the same container? That’s your classic Neapolitan ice cream! So, you guessed it, Neapolitan cake is a three-layer cake stacked up with chocolate, vanilla, and strawberry layers.
Some bakers just add a vanilla buttercream frosting over the whole cake so that when you cut into it, the layers are a little surprise. I decided to jazz up my version with separate chocolate, vanilla, and strawberry buttercreams to match each layer and add extra flavor to each bite.

Everything you’ll need to make this Neapolitan cake
While the three separate layers may look tricky, they’re actually easier to make than you think because you just need ONE base cake batter and ONE base buttercream. This version is gluten-free, too! Here’s what you’ll need to make it:
- Sugar: we’re using organic cane sugar (or granulated sugar) in the cake batter itself to sweeten.
- Eggs: you’ll need 4 eggs to help the cake bake up properly.
- Yogurt & olive oil: the cake gets extra moisture from whole-milk Greek yogurt and a little olive oil or avocado oil.
- Flour: we’re using a mix of fine blanched almond flour and gluten-free oat flour to keep the cake gluten-free and get the perfect texture.
- Baking staples: don’t forget vanilla extract, baking soda AND baking powder, and salt.
- For the cake layers: you’ll add unsweetened cocoa powder to make the chocolate batter and strawberry powder from freeze-dried strawberries to make the strawberry batter.
- For the buttercream: the base of the frosting is made with salted butter, powdered sugar, vanilla, and whole milk or heavy cream. You’ll then add a little cocoa powder to make the chocolate frosting, and the remaining freeze dried strawberry powder for the strawberry frosting!
Can I use different flours?
Unfortunately, no, I cannot recommend a substitute for the almond flour and oat flour in this recipe.
Can I make it dairy-free or vegan?
- To make dairy-free: use a dairy-free Greek yogurt in the cake, and dairy-free butter and dairy-free milk in the frosting.
- To make vegan: I have not attempted to make this vegan, so I cannot recommend a substitute that will work and still keep the cake nice and fluffy.

One base, three different flavors
As I mentioned, instead of making three totally different cake batters and three different frostings, you’ll just need to mix together one of each! Here’s how I simplified:
- Make the base of the cake batter and the buttercream
- Divide each into 3 different bowls
- Leave the vanilla layer as-is, add cocoa powder to the chocolate batter and frosting, and add strawberry powder to the strawberry batter and frosting!

Add more color to the strawberry layer
To get a deeper pink-colored cake for your strawberry layer, I recommend adding just a couple drops of natural red food coloring to the batter.
How to get beautifully smooth frosting
The key to getting seamless, smooth, beautiful frosting is doing a crumb coat on the outside. This means adding a thin layer of frosting to the whole cake, chilling the cake to help solidify this layer of frosting, and then adding the rest of the frosting so that it sticks to that first layer instead of the cake itself. It will really help elevate the look of your Neapolitan cake!
- Cool the cakes. First, make sure the cake layers are completely cooled before frosting them. If you try to frost a warm cake, the frosting will soak into the cake!
- Set the chocolate layer. Spread a little chocolate buttercream on your platter or cake stand, then invert the chocolate cake layer on top of it. This will secure the whole cake.
- Frost, then add the vanilla layer. Frost the top of the chocolate layer with some of the chocolate butter cream, then invert the vanilla layer on top.
- Repeat with the strawberry layer. Frost the top of the vanilla layer with the vanilla buttercream, then invert the strawberry layer on top.
- Create the crumb coat. Add a thin layer of frosting around the outside of each cake layer using its respective frosting. This is the crumb coat!
- Chill, frost & smooth it out. Place the full cake in the fridge for 20 minutes, or the freezer for 10 minutes, to solidify the crumb coat. Then finish frosting each layer, and use a bench scraper to create a uniform look around the whole cake (I like to spin the cake slowly to smooth the frosting!)

Decorate your Neapolitan cake
If you’re a little *extra* like me, try topping your cake with:
Make this cake ahead of time
This gluten-free Neapolitan cake (and all three-layer cakes) can be prepped a day ahead! Bake the cake layers as instructed, then wrap them separately with plastic wrap and/or foil and store them at room temperature or in the fridge. Then, you’ll just have to frost them the next day!
Storing & freezing tips
- To store: keep slices of cake in an airtight container in the fridge for up to 5 days.
- To freeze: feel free to freeze this Neapolitan cake, frosted or unfrosted, for up to 2 months. I recommend freezing it unfrosted and in individual layers for the best results. First, wrap each individual layer in plastic wrap, then aluminium foil, and then place the cakes in a zip-top freezer bag. When you’re ready to serve it, simply thaw it in the refrigerator overnight, and then let the cake come to room temperature before frosting and serving.

Our favorite cake-baking tools
Get all of my go-to kitchen tools here!
More cake recipes you’ll love
Get all of my cake recipes here!
I hope you love this beautiful Neapolitan cake! If you make it, be sure to leave a comment and a rating so I know how you liked it. Enjoy, xo!
The
Ambitious Kitchen
Cookbook
125 Ridiculously Good For You, Sometimes Indulgent, and Absolutely Never Boring Recipes for Every Meal of the Day

Gorgeous Neapolitan cake with perfect chocolate, strawberry, and vanilla cake layers. This gluten-free Neapolitan cake is made with a single cake batter base and a single buttercream frosting base to easily create each of the three flavors. Celebrate Valentine’s Day, birthdays, and any special occasions with this iconic dessert!
Ingredients
- Freeze dried strawberries
- 1 ounce (28 grams) bag of freeze dried strawberries
- Wet ingredients
- 1 cup (200g) granulated sugar (I used organic cane sugar)
- 4 large eggs, at room temperature
- ½ cup (113g) plain whole-milk Greek yogurt
- ⅓ cup (67g) extra virgin olive oil or avocado oil
- 2 teaspoons vanilla extract
- Dry ingredients
- 2 cups (224 grams) fine blanched almond flour
- 1 cup (95 grams) oat flour, gluten free if desired
- 1 teaspoon baking powder
- ½ teaspoon baking soda
- ½ teaspoon kosher salt
- Mix-ins
- 2 tablespoons unsweetened cocoa powder
- 3 tablespoons strawberry powder (from freeze dried strawberries)
- Buttercream
- 1 cup (2 sticks, 226 grams) salted butter
- 2 ½ cups (300 grams) powdered sugar
- ½ teaspoon vanilla extract
- 4 to 6 tablespoons whole milk or heavy cream, divided
- 2 tablespoons unsweetened cocoa powder
- Remaining strawberry powder
Instructions
-
Preheat the oven to 350 degrees F. Line the bottom of three 6-inch round cake pans with parchment paper rounds. Spray the parchment paper and sides of the pan with cooking spray to prevent sticking.
-
Blend the freeze dried strawberries: In a small, high powered blender, add the freeze dried strawberries and blend on high until they are a fine powder similar to flour, 30 seconds to 1 minute. Set aside.
-
Mix the wet ingredients: In a large bowl, whisk together the sugar, eggs, yogurt, oil, and vanilla extract until smooth and well combined, about 1 minute.
-
Mix in the dry ingredients: To the bowl with the wet ingredients, add in the almond flour, oat flour, baking powder, baking soda, and salt. Whisk together until smooth and well combined.
-
Divide the batter and add mix-ins: Evenly divide the batter into three separate medium bowls by adding approximately 1 heaping cup of batter to each bowl. Add 2 tablespoons of cocoa powder to one of the bowls, and 3 tablespoons of the freeze dried strawberry powder to one of the other bowls (reserve the remaining strawberry powder for the frosting.) Stir the mix-ins into each respective batter with a spatula until well combined and smooth so that you now have one chocolate batter, one strawberry batter and one plain vanilla batter. Please know that if you want the strawberry cake to appear more pink when baked, you’ll need to stir in a few drops of red food dye to the strawberry cake batter (I use natural red food dye).
-
Bake the cake: Add each batter to a prepared cake pan, smoothing the top with a spatula. Bake until a tester inserted into the center comes out mostly clean with just a few crumbs attached, 23 to 30 minutes. Cool the cakes completely (you can even make them up to a day ahead, then wrap tightly with plastic wrap and store at room temperature or in the fridge).
-
Make the frosting: To an electric stand mixer (or a large bowl if using a hand mixer), add the softened butter and beat on high speed until it lightens in color and is nice and fluffy, 1 to 2 minutes. Scrape the bowl down with a spatula, then add in the powdered sugar and mix on medium low speed for 30 seconds to incorporate the sugar into the butter. Increase the speed to high and beat until mixture is well combined and smooth, 1 minute. Add in vanilla extract and 2 tablespoons of milk and beat again on high, 30 seconds.
-
Create the frosting flavors: Divide the frosting into 3 medium bowls by adding approximately ¾ cup of frosting to each bowl. Add 2 tablespoons of cocoa powder and 1 tablespoon milk to one bowl and mix with a spatula until well combined. Add the remaining strawberry powder and 1 tablespoon of milk to another one of the bowls and mix with a spatula until well combined. If any of the frostings are too thick, stir in another tablespoon of milk to create a creamier consistency. The last bowl is the vanilla frosting, which is good to go as is.
-
Frost the cake: Spread about 1 tablespoon of the chocolate frosting in the middle of a cake stand on a platter (this will help to anchor the cake). Invert the chocolate cake onto the stand so the flat side of the cakes up. Spread about ⅓ cup of the chocolate buttercream over the chocolate cake spreading all the way to the edges. Next, place the inverted vanilla cake layer on top of the chocolate buttercream and top with about ⅓ cup of vanilla frosting and spread all the way to the edges. Finally place the inverted strawberry cake on top of the vanilla buttercream and add ⅓ cup of frosting, spreading it all the way towards the edges.
-
Using an offset spatula, apply a thin layer of frosting around the outside of each cake. Use chocolate buttercream for the chocolate cake, vanilla frosting for the vanilla cake, and strawberry frosting for the strawberry cake. This thin layer of frosting is called your crumb coat, which will allow for a beautiful seamless look once complete. Transfer the cake to the freezer for 10 minutes (or fridge for 20 minutes) to set the crumb coat.
-
Once the crumb coat is set, remove cake from the freezer and finish frosting just like you did above with each respective frosting matching each cake. It’s okay if it isn’t perfect! Finally use a bench bench scraper to create a uniform, very thin layer of frosting around the cake. It helps to do this while slowly spinning the cake stand and gently pressing the scraper against the side of the cake. (The frostings will naturally begin to come together where they meet, similar to an ombre cake.)
-
To store: Keep slices in an airtight container in the fridge for up to 5 days.
Recipe Notes
To make dairy-free: use a dairy-free Greek yogurt in the cake, and dairy-free butter and dairy-free milk in the frosting.
Recipe by: Monique Volz // Ambitious Kitchen | Photography by: Eat Love Eats