New year, brand new artisan bread for all of you to bake your heart out this winter! I first shared my original No Knead Seeded Honey Oat Artisan Bread back in 2023, and (no joke) HUNDREDS of you have made it and fallen in love with it.
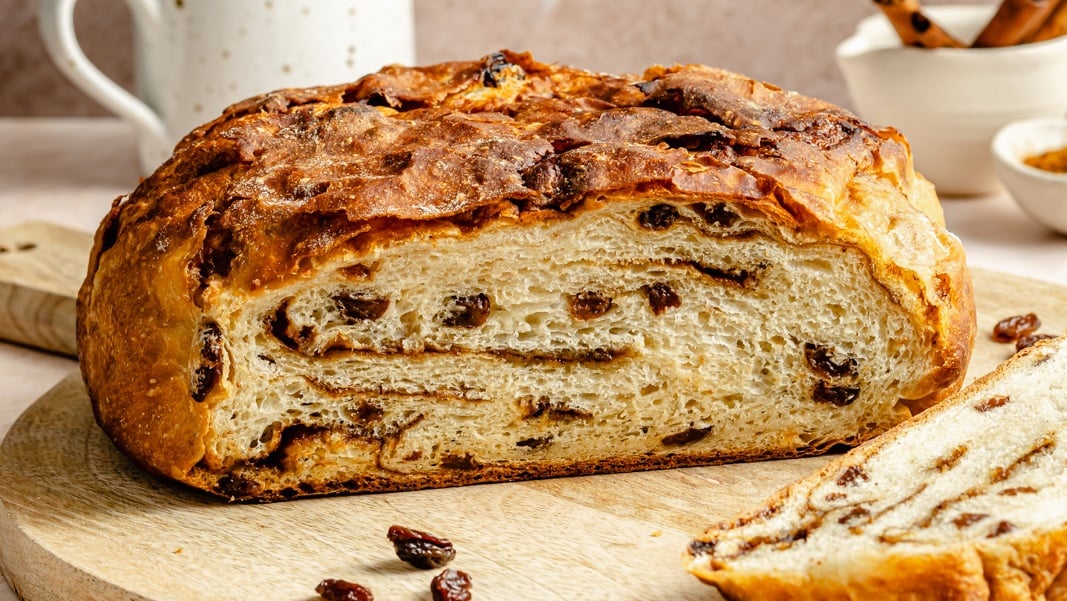
Without further ado, say hello to my no knead cinnamon raisin artisan bread! I basically took the base of my famous artisan bread and added a beautiful, perfectly sweet twist to it with juicy raisins and a cinnamon-sugar swirl. I actually got a few requests for this bread flavor a while back, and it turned out even better than I could’ve imagined.
As always with baking, read through those directions and tips carefully, and please weigh your ingredients with a kitchen scale!

Bakery-quality bread made right at home
You don’t need to be a professional to make this beautiful cinnamon raisin artisan bread, but you’ll probably feel like one after you bake it! This bread:
- Uses easy tools: because there’s no kneading required, you won’t need a stand mixer!
- Is made with pantry staples: flour, water, milk, yeast, and a little sweetener. Those are the core ingredients you’ll need to bake it up.
- Has perfect flavor & texture: a little pure maple syrup, cinnamon-sugar, and raisins give it a lovely, light sweetness, and the baking process results in bread that’s golden on the outside but light and fluffy on the inside.
Ingredients in this cinnamon raisin artisan bread
While this bread looks like it came straight from a fancy bakery, there are no fancy ingredients required. Here’s what you’ll need:
- Flour: the key to any yeasted bread? Using bread flour! It has a higher protein level than regular, all-purpose flour, which helps it produce more gluten and gives the bread that fluffy, yet perfectly chewy texture.
- Raisins: you’ll whisk the raisins right in with the flour before mixing the dough together so that they distribute evenly throughout the bread.
- Baking staples: you’ll need rapid rise yeast (AKA instant or quick rise yeast) to help the bread bake up, and salt to give it the right flavor.
- Water & milk: we’re using a combination of filtered water and milk to add moisture to the dough.
- Maple syrup: a little pure maple syrup will sweeten the bread and help activate the yeast.
- For the filling: similar to my cinnamon rolls, this bread gets a cinnamon-sugar swirl filling by spreading softened butter into the risen dough and rubbing in brown sugar and ground cinnamon.

A note on gluten-free substitutes
Just like with all of my yeasted breads and baked goods, I cannot recommend a gluten-free flour substitute for this recipe. In my recipes, the gluten in the flour is essential for creating a light, fluffy texture with the perfect amount of chew.
Can I make it vegan?
Absolutely! You may have noticed that there are actually no eggs or honey in this recipe, so you’ll just have to swap the butter in the filling for a vegan butter.

Remember to use the right yeast
We’re using rapid rise, or quick rise yeast in this recipe. Unlike “active dry yeast,” rapid rise yeast doesn’t have to be proofed, so you don’t have to take the extra step and wait for it to activate before continuing with the recipe. In this cinnamon raisin artisan bread, you’ll simply:
- Mix the yeast with the rest of your dry ingredients.
- Heat up the milk and water until they reach 115 degrees F, then mix in the maple syrup.
- Mix the dry and wet ingredients together until they’re just incorporated.
That’s it! The maple syrup and warm wet ingredients are all you need to get the yeast going.

How to get the perfect cinnamon sugar swirl
It’s easier to do than you think, and just requires an extra couple of steps!
- After your dough has risen for the first time, place it onto a floured surface and sprinkle with a little extra flour.
- Gently press the dough out into an 8×8-inch square.
- Use your fingers to spread the softened butter over the dough (just like you would with rolled-out cinnamon rolls), sprinkle the cinnamon sugar mixture on top, and pat the sugar into the butter.
- Grab one corner of the dough, stretch it upward, and fold it over to the opposite side of the ball. Repeat with the remaining three corners, and then pinch the dough in the middle to seal it.
- Flip the dough over so that it’s seam-side down, then shape it into a dome.

My best tips & tricks for baking this bread
When you’re working with a yeasted bread like this cinnamon raisin artisan bread, there are a few key tips you need to remember:
- Weigh your ingredients. Especially with yeasted doughs and breads, it’s crucial that you weigh your ingredients using a kitchen scale. This is the most accurate way to bake, and it is how I (and many others) tested this recipe multiple times!
- Do not overmix. Be careful not to overmix the dough after combining the wet and dry ingredients. The dough should be slightly sticky and shaggy. Overmixed dough will lead to a dense bread loaf.
- Pre-heat your dutch oven. Before adding the dough to your dutch oven and baking it, you’ll need to place it in your cold oven and preheat the oven to 425 degrees F (the temp you’ll bake the bread at). Heating up the pan FIRST ensures that the bread has what’s called an “oven spring,” which is the additional burst or rise that occurs in the bread right when it gets into the oven before the crust starts to form.
- Bake it with the lid on. After pre-heating the dutch oven, you’ll want to bake the bread in it with the lid ON first so that the bread is able to steam a bit while it’s baking. This will give the bread that crispy crust.
- Cool before cutting. Like almost every baked good, make sure you let the bread cool for at least 2 hours before cutting into it so that it retains its shape.

Our fav ways to enjoy this cinnamon raisin bread
As with all bread recipes (in my opinion), start by toasting up a thick slice, then add:
Storing & freezing tips
- To store: it’s best to store this cinnamon raisin artisan bread on the counter. Once the bread is completely cool, wrap it in plastic wrap and store it at room temperature. If the weather is hot or humid, it’s best to store the bread in the refrigerator.
- To freeze the bread: wrap the bread in plastic wrap, then seal it in a bag, making sure to get all the air out of the bag. You can also wrap the bread in plastic and then wrap it tightly in foil. Bread should last 3 months in the freezer. Once ready to serve, unwrap the bread and thaw at room temperature.

Tools you’ll need
Get all of my go-to kitchen tools here!
More bread recipes you’ll love
Get all of our bread recipes here!
I hope you love this cinnamon raisin artisan bread! If you make it, be sure to leave a comment and a rating so I know how you liked it. Enjoy, xo!
The
Ambitious Kitchen
Cookbook
125 Ridiculously Good For You, Sometimes Indulgent, and Absolutely Never Boring Recipes for Every Meal of the Day
Cinnamon Raisin Swirl Artisan Bread

Incredible cinnamon raisin artisan bread baked to golden perfection with juicy raisins in each bite. This easy, no knead cinnamon raisin bread is made with simple pantry staples and is a wonderful recipe for beginner bread bakers! Toast it up with butter and a sprinkle of sea salt for a lovely breakfast or snack.
Ingredients
- Dry ingredients
- 420 grams (3 ½ cups) bread flour, plus more for shaping and dusting
- 107 grams (⅔ cup) raisins
- 2 ¼ teaspoons rapid rise yeast (also known as quick rise yeast)
- 1 teaspoon kosher salt
- Wet ingredients
- 180 grams (¾ cup) filtered water
- 160 grams (⅔ cup) milk of choice (I use almond milk)
- 78 grams (¼ cup) pure maple syrup, at room temperature
- Filling
- 71 grams (⅓ cup) brown sugar
- 1 ½ teaspoons cinnamon
- 2 tablespoons salted butter, at room temperature*
Instructions
-
Prepare the dry ingredients: In a large bowl, whisk together the bread flour, raisins, yeast and salt until well-combined. Set aside.
-
Prepare the wet ingredients: In a large microwave-safe bowl, stir the water and the milk together until well-combined. Microwave in 30-second intervals until slightly warmer than bath water, or approximately 115°F, 1 to 1 ½ minutes. Then, stir in the maple syrup. Add the wet ingredients to the dry ingredients and mix with a wooden spoon until just incorporated, no flour remains, and the dough is slightly sticky and shaggy. Cover the bowl with plastic wrap and a towel, and let stand at room temperature until doubled in size, about 1 ½ to 2 hours.
-
Prepare filling: In a small bowl, mix together the brown sugar and cinnamon until combined. Set aside.
-
Form the dough: Generously flour a clean surface. Place the risen dough on top of the flour and sprinkle with a little more flour, then gently press dough out into a roughly 8×8 inch square. Spread the softened butter over the dough with your fingers, then sprinkle the butter with the cinnamon sugar mixture. Use your fingertips to pat the cinnamon sugar into the butter then grab one corner of the dough, stretch it upward, and fold it over to the opposite side of the ball. Grab the next corner, stretch it upward, and fold it over. Repeat with the remaining two corners, pinching the dough in the middle to seal it all in. Flip it over then shape into a dome. It’s not going to be perfect, but it’s important you don’t mess with it too much because you don’t want a bunch of cinnamon sugar on the outside of the bread.
-
Line a large bowl with parchment paper. Place the dough ball in the bowl and cover with plastic wrap and a towel. Allow the dough to rest again until fully proofed and you can poke your finger into the dough about an inch without the indentation bouncing back immediately, 45 minutes to 1 hour.
-
After the dough has been on its second proof for about 15 minutes, place a 4- to 6-quart Dutch oven or oven-safe pot with a lid in the cold oven on the middle rack. Preheat the oven to 425°F with the pot in the oven for 30 minutes.
-
Bake the bread: Remove the pot and, taking care not to burn yourself, immediately add the parchment paper with the dough into the pot. Cover with the lid, and bake for 20 minutes.
-
Remove the lid from the pot and return the pot to the oven. Bake until the bread is golden and makes a light hollow sound when tapped, 8 to 15 minutes. Carefully grab onto the parchment paper and immediately remove bread from the pot and transfer to a wire rack. Allow bread to cool completely, at least 2 hours, before cutting into 12 slices.
-
To serve: Toast each slice until golden brown on the edges. Serve with butter and a sprinkle of flaky sea salt, if desired!
Recipe Notes
See the full post for tips, tricks & more!
Nutrition
Serving: 1sliceCalories: 214calCarbohydrates: 43.3gProtein: 4.8gFat: 2.7gSaturated Fat: 1.3gFiber: 1.6gSugar: 15.7g
Recipe by: Monique Volz // Ambitious Kitchen | Photography by: Eat Love Eats