When I think back to all of the memories I had with my Dad, who passed away suddenly when I was 18, I am met with joy, comfort and immense love. He wasn’t a perfect parent or human, he was incredibly flawed and his life was taken too early because of it — but he had a gold heart, and I’ll never forget the way he made me feel. I’m crying as I write this because 15 years later, his memory is still with me nearly every day. His loving heart, his warm embrace, his big gigantic laugh and presence, and of course, the recipes we made together.
Dad especially loved to bake sweets and his yellow cake was our go-to dessert. He made it special with a few twists here and there, and throughout the years, I think I’ve made it even better. Today, I’m celebrating him and sharing his memory through food with all of you. I hope you get a chance to bake this cake! It’s a big hug, and extra delicious with sprinkles on top. A big thank you to my Dad, who inspired my love of baking — I’ll always love you.


What is yellow cake?
You may have grown up on boxed, store-bought yellow cake and wondered “wait, what does yellow cake taste like?” If you didn’t already know, white cake and yellow cake are actually different in terms of ingredients, which gives them a different look AND flavor:
- White cake typically uses all egg whites and no egg yolks, along with a combination of butter and shortening. The lack of egg yolks means the cake is lighter in color and has less fat, which leads to a spongier, lighter texture.
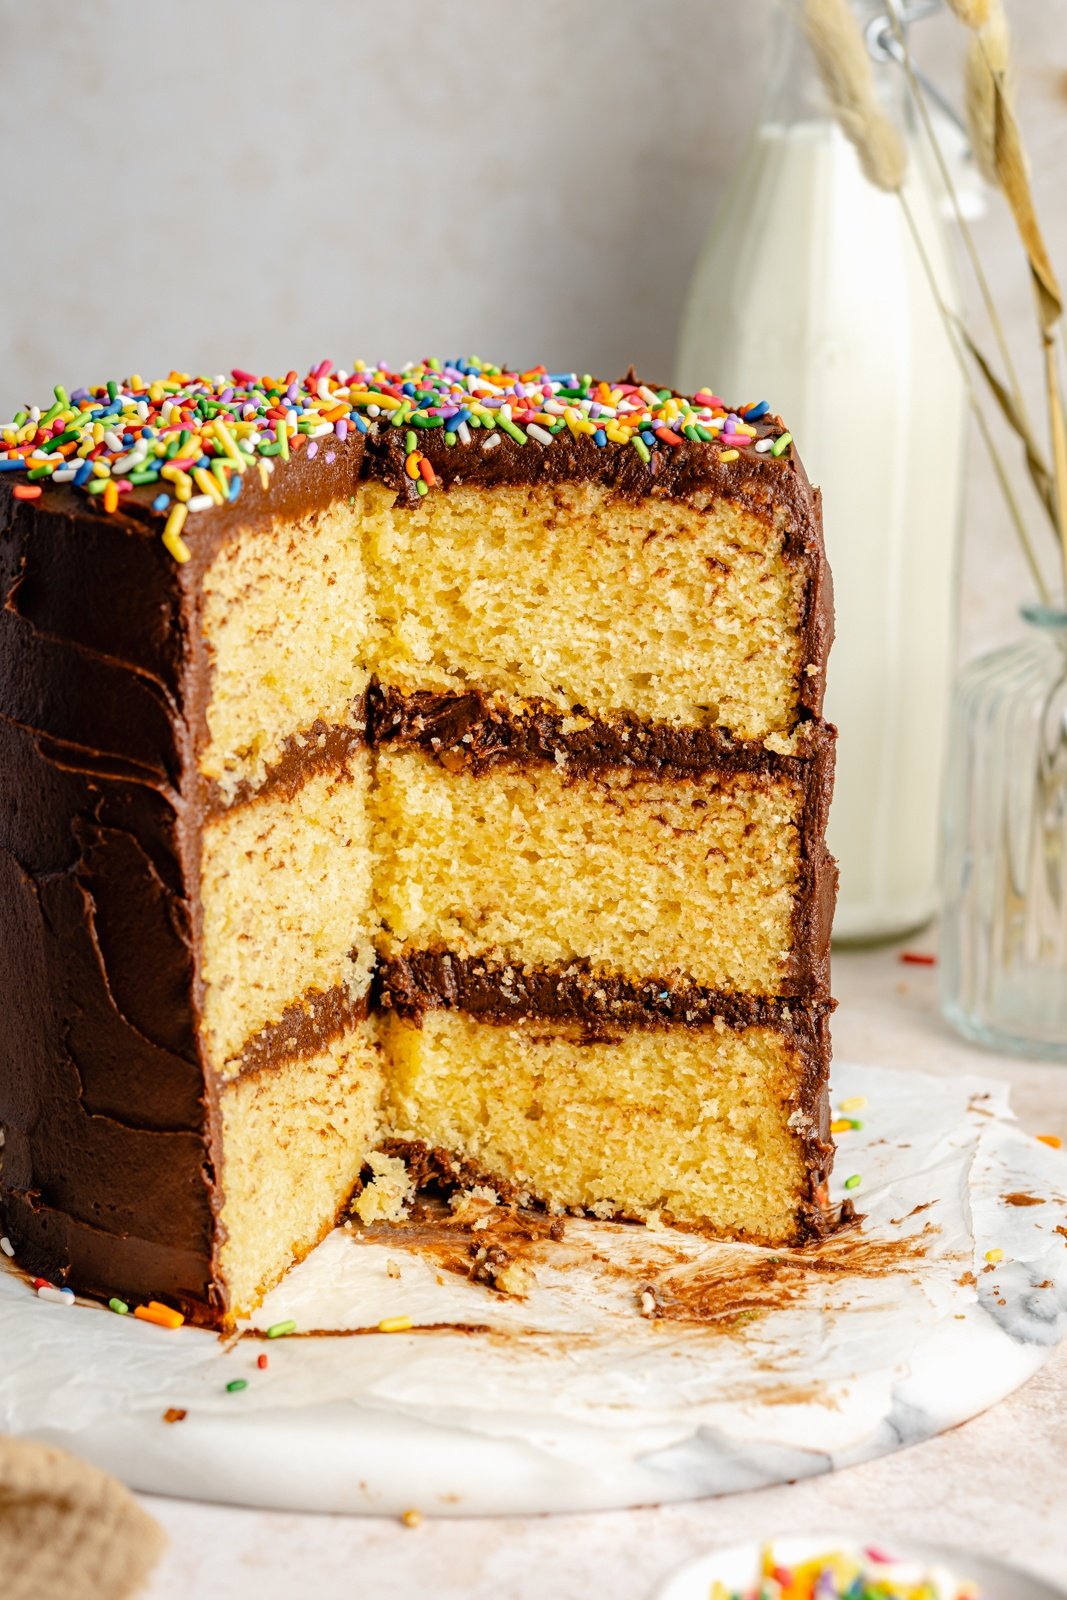
- Yellow cake has both whole eggs and extra egg yolks and is made with all butter (no shortening), giving the cake a yellow color. The egg yolks add more fat, giving the cake a denser, more moist texture.


Ingredients in the best yellow cake you’ll ever make
Move over, boxed yellow cake, we’re making the real deal from scratch. My Dad’s incredible yellow cake has a few specific ingredients that give it the most perfect texture and flavor. Don’t forget about that fluffy chocolate buttercream! Here’s everything you’ll need to make it:
- Flour: feel free to use all-purpose flour or cake flour in this recipe. See my notes on the differences below!
- Baking staples: you’ll need both baking powder and baking soda, plus salt and vanilla extract. Learn how to make your own vanilla here.
- Butter: as I mentioned above, butter is a key component in the texture of yellow cake. I like to use salted butter in my baked goods, but you can also use unsalted butter. If you use unsalted, just add a pinch more salt to this recipe.
- Sugar: you’ll need granulated sugar to sweeten the cake.
- Eggs: the key to the perfect yellow cake? Egg yolks! This yellow cake recipe uses both eggs and egg yolks.
- Yogurt: you’ll also need some vanilla yogurt for added moisture. I recommend using whole-milk yogurt, or at least 2% yogurt.
- Buttermilk: another special ingredient? Buttermilk! The acidity in buttermilk reacts with the baking agents to give the cake a wonderful crumb texture and a balance with the sweetness. Learn how to make buttermilk here with just 2 ingredients.
- For the frosting: we’re making my Dad’s fluffy chocolate buttercream frosting [LINK], which is made with butter, powdered sugar, cocoa powder, cooled coffee, heavy cream, vanilla, and salt.


Using all-purpose flour vs cake flour
Cake flour will produce a very light and delicate crumb in this yellow cake recipe, but it’s not always accessible. All-purpose flour will also work perfectly fine! Alternatively, you can use 2 ¼ cups of all-purpose flour and ¼ cup of cornstarch to achieve a light and airy crumb in this recipe.
An easy swap for buttermilk
As I mentioned, you can make your own buttermilk right at home using milk and either lemon juice or white vinegar! Check out my full tutorial here.
If you do not have these ingredients on hand, feel free to use whole milk in place of the buttermilk.


Can I make this yellow cake gluten free or vegan?
Unfortunately, no, I cannot recommend a gluten-free flour substitute in this homemade yellow cake recipe, nor can I recommend swapping the eggs for flax eggs. Sorry!
My favorite cake-baking tools
Get all of my go-to kitchen essentials here!


Choose your cake size
There are a few different cake pan sizes you can use to make this classic yellow cake recipe:
- Three 6-inch round cake pans: bake for 30 to 40 minutes
- Two 8-inch cake pans: bake for 25 to 35 minutes
- One 9×13-inch pan: bake for 25 to 35 minutes
- 24 cupcakes: bake for 18 to 22 minutes
How to make the best yellow cake
- Mix the dry ingredients. Start by whisking together the flour and baking staples in a large bowl.
- Mix the wet ingredients. Cream together the butter and sugar in the bowl of an electric stand mixer (or in a large bowl using an electric hand mixer) on high speed until it becomes pale yellow. Scrape down the bowl, then add the whole eggs one at a time, beating the mixture for 1 minute between each egg. Add the rest of the wet ingredients BESIDES the buttermilk, and mix on medium speed.
- Make the batter. Pour half of the flour mixture into the wet ingredients while the mixer is on low speed, then add the buttermilk, and finally the rest of the dry ingredients. Mix the batter on medium low until just combined.
- Divide, bake & cool. Divide the batter between three 6-inch cake pans or two 8-inch pans and bake the cakes. Let the cakes completely cool before removing them from the pans.
- Make the frosting. Whip together the chocolate buttercream in an electric mixer or using a hand mixer in a large bowl.
- Frost & enjoy! Use an offset spatula to frost the cake layers as you stack them up, then create a crumb coat on the outside of the cake (more on this below!) I like to use a bench scraper to create a thin layer of frosting around the cake. Chill the cake in the fridge, then finish it off by adding the rest of the frosting to the outside. Serve immediately or store it in the fridge!


The key to beautifully frosted cake
As I mentioned above, I like to do a crumb coat on my cakes so that the frosting looks beautiful and clean. To do so:
- Use an offset spatula to frost each layer as you normally would, then frost the outside of the cake with a very thin layer of frosting. I also like to use a bench scraper to ensure that the frosting is even on the outside of the cake.
- Place the cake in the fridge for 10-15 minutes. This is so that the crumbs stick to the thin layer of frosting and not your main layer.
- Frost the outside of the yellow cake with the rest of the chocolate frosting and serve!
The best frostings for yellow cake
I, of course, love using my Dad’s famous chocolate buttercream for this yellow cake, but here are some more frosting recipes you can try:


Don’t forget these tips for the perfect yellow cake
- Follow the recipe. Baking, as you may know, is a very exact science. Please follow the recipe ingredients and measurements unless otherwise noted to ensure that the cake comes out perfectly.
- Measure your flour correctly. In this recipe, feel free to weigh your flour OR use my tutorial here to accurately measure your flour using the spoon and level method.
- Use room temp butter. Be sure your butter is at room temperature in both the cake batter and the frosting. You can place your sticks of butter on the counter to come to room temperature about an hour before you plan to bake this yellow cake.
- Do not overmix. Make sure you mix the cake batter ingredients until they’re just combined — do not overmix. Overmixing will result in a denser, gummier cake texture.
- Grease your pans. I recommend lining your cake pans with parchment paper AND greasing the insides with nonstick cooking spray to prevent any sticking.
- Do not overbake. Bake the cake layers until a tester inserted into the center comes out mostly clean with just a few crumbs attached. Overbaking will result in a drier cake.


How to store & freeze homemade yellow cake
- To store: feel free to store this yellow cake with chocolate buttercream covered on the counter at room temp for 1 day, then I recommend transferring it to the refrigerator for up to 5 days.
- To freeze: feel free to freeze this yellow cake either frosted or unfrosted for up to 2 months. I recommend freezing it unfrosted in individual layers for the best results. First, wrap each individual layer in plastic wrap, then aluminum foil and then place the cakes in a zip-top freezer bag or airtight container. When you’re ready to serve it, simply thaw it in the refrigerator overnight and then let the cake come to room temperature before serving.
More cake recipes you’ll love
Get all of my cake recipes here!
I hope you love my Dad’s extraordinary yellow cake recipe! If you make it be sure to leave a comment and a rating so I know how you liked it. Enjoy, xo!
Dad’s Extraordinary Yellow Cake with Chocolate Buttercream Frosting


My Dad’s extraordinary yellow cake with chocolate buttercream frosting is the perfect dessert for celebrating birthdays and special occasions. With the perfect crumb, sweetness, and fluffy frosting, this is truly the best yellow cake recipe you’ll ever make!
Ingredients
- Dry ingredients:
- 2 ½ cups (300g) all purpose flour (or cake flour*)
- 2 teaspoons baking powder
- ¼ teaspoon baking soda
- ½ teaspoon kosher salt
- Wet ingredients:
- 1 cup (2 sticks, 226g) salted butter, at room temperature
- 1 ¾ (350g) cup granulated sugar
- 3 eggs
- 3 egg yolks
- 1 tablespoon vanilla extract
- ½ cup (113g) vanilla whole-milk yogurt (2% or higher for best results)
- ½ cup (120g) buttermilk (or sub whole milk)
- 1 batch Chocolate Buttercream Frosting
Instructions
-
Preheat the oven to 350°F. Line the bottom of three 6-inch round cake pans or two 8-inch round cake pans with parchment paper rounds. Spray the parchment paper and sides of the pan with cooking spray. (All of this is essential to prevent cake from sticking!)
-
Mix the dry ingredients: In a separate large bowl, whisk together the flour, baking powder, baking soda and salt and set aside.
-
Mix the wet ingredients: In the bowl of an electric mixer, add the butter and sugar and cream together on high speed for 1 to 2 minutes or until mixture becomes pale light yellow in color. (Feel free to use a hand mixer for this if that is your preference.) Using a spatula, scrape the bowl down, then add in the eggs, one at a time, beating for 1 minute between each egg addition. Finally add the egg yolks, vanilla and yogurt and mix again on medium speed until well combined, about 1 minute longer. (NOTE: Do not add in the buttermilk yet.)
-
With the mixer on low speed, add half of the dry ingredient mixture to the wet ingredients, then all of the buttermilk, followed by the remaining dry ingredients. Mix on medium low speed until just combined. (Alternating the flour and buttermilk will create a beautiful crumb for the cake!)
-
Bake the cake: Divide the batter evenly between the prepared pans and smooth the tops. Bake for 25 to 35 minutes in the 8-inch pans or 30 to 40 minutes in the 6-inch pans, until a tester inserted into the center comes out mostly clean with just a few crumbs attached.
-
Cool the cakes completely before removing them from the pan. To do so, run a butter knife around the edges of the pan, then invert them and place them on a wire rack. You can also make them up to a day ahead, then wrap tightly with plastic wrap and store at room temperature or in the fridge.
-
Make the frosting: use my Dad’s famous Chocolate Buttercream Frosting recipe for this cake.
-
Frost the cake: Spread about 2 tablespoons of the frosting in the middle of a cake stand or platter (this will help anchor the cake). Invert the first layer of the cake onto the stand so the flat side of the cake is up. Top with about ½ cup of frosting. Using an offset spatula, spread the frosting to the edge of the cake, ensuring you have an even layer. Place the next layer of cake, flat-side up, on top of the first layer, and repeat, topping with an additional ½ cup of frosting and spreading it to the edge. Place the third layer (if using) flat-side up on top, then frost the top and sides of the cake with ½ to ¾ cup of frosting, using a bench scraper to create a uniform, very thin layer of frosting around the cake. It helps to do this while slowly spinning the cake stand, and gently pressing the scraper against the side of the cake. (This step is called a crumb coat which will allow for a beautiful, seamless look once complete.) Transfer the cake to the fridge for at least 15 minutes, or until the crumb coat layer of frosting has firmed up to the touch. Once the cake is chilled, repeat the process of frosting the top and sides of the cake with the remaining frosting, using an offset spatula. (Since the cake has been chilled, the crumb coat should allow for a smoother finish.)
-
Enjoy immediately or store the cake in the fridge for up to 5 days, well-covered to ensure freshness.
Recipe Notes
If you prefer a sweeter yellow cake, use 2 cups of sugar instead of 1 ¾ cups.
Recipe by: Monique Volz // Ambitious Kitchen | Photography by: Eat Love Eats

